
PRODUCTS USED: COFFEE BREAK DESIGNS MDF SHRINE, 12x 12 Chipboard, TEN SECOND STUDIO METAL SHIM apple green, UTEE clear and gold, Beads, ANGELINA FIBRES, leather twine, Smooch Accent inks, LUMIERE ACRYLIC PAINT halo blue/gold, GOLDEN GLASS MEDIUM Perfect pearls mica paint and Dimensional Magic ....oh and lots of double sided tape glue tissue paper and prayer!!!
COFFEE BREAK DESIGNS ARE AVAILABLE IN STORE IN SCRAPTIVATE
OR ONLINE BY REQUEST :)

 some EXAMPLES OF
 COFFEE BREAK DESIGNS


Strange first one in the tsunami would be this one!!! ??? LOL
This one I thought my American Picker mates would be dusting this off and wondering why it was never finished!!! It is kinda ...I think it needs a base though?
Anyway here's the story...
Originally I started this in December 2010 round a table in a caravan in Sydney... LOL The greatest weekend in my recent memory the weekend I spent with my friends Natalie Wolfe, Owner and legend friend of SCRAPTIVATE and Jenny Burns wondrous FABBO AWESOME chick babe friend. We were bunking in and working the SCRAPTIVATE booth in Sydney for the Sydney Papercraft festival. So after a hard day at the show what did these birds of a feather do but ....play with arty scrappy bits and pieces till the early hours of the morning ...or until other baahumbugs in the cabin yelled at us to stop giggling and go to bed.
Sadly it seems too long ago! I haven't felt so much a part of the scrappy sisterhood since!
Okay ....back t the story.... the challenge was to make stuff with what ever materials/mediums that came back for the night from the show's demonstration table . I took a shine to this little MDF shrine made by COFFEE BREAK DESIGNS so I began experimenting!
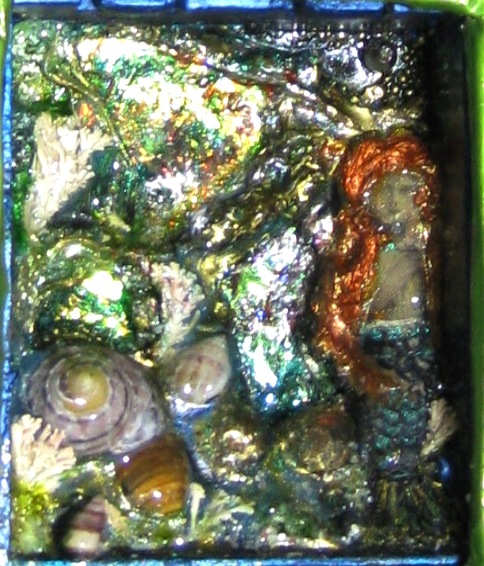
Inside the COFFEE BREAK DESIGN shrine I began to play with layers of UTEE enamel (similar to a clear embossing powder) and beads of a bead trim. whacked it in and heated it up with a heat gun and added some Angelina crystalina fibres (which is like a melt able cellophane) and it all looked "oceany" for want of a better word ! LOL
So I went with it ...
Created a little mermaid from collections images. Created her some hair with thread I got from unraveling the ribbon from the bead trim I took the beads from, then painted it with a gorgeous orange smooch ink.

When I got home from Sydney eventually I picked it back up with a mind to finish what Id started.
Then the ideas snowballed... I added some authentic Tuross Heads sea shells (where we holiday down the south coast) and some coral looking stuff that came home in the same bucket of shells. I added a bit of perfect pearls paint and some Dimensional magic. Then it started to get interesting...
the story gets alittle hazy here cause sometime stuff just happens....
but some how I was playing with my delightful CUTTLEBUG and I decided to try and create some of my own embossing plates and before you knew it a wave was being built to surround the little shrine.
Prototype 1
I made my embossing plate out of chip board leather thonging and dimensional magic. I wanted a mechanical/steampunked wave so I built the "plate" below
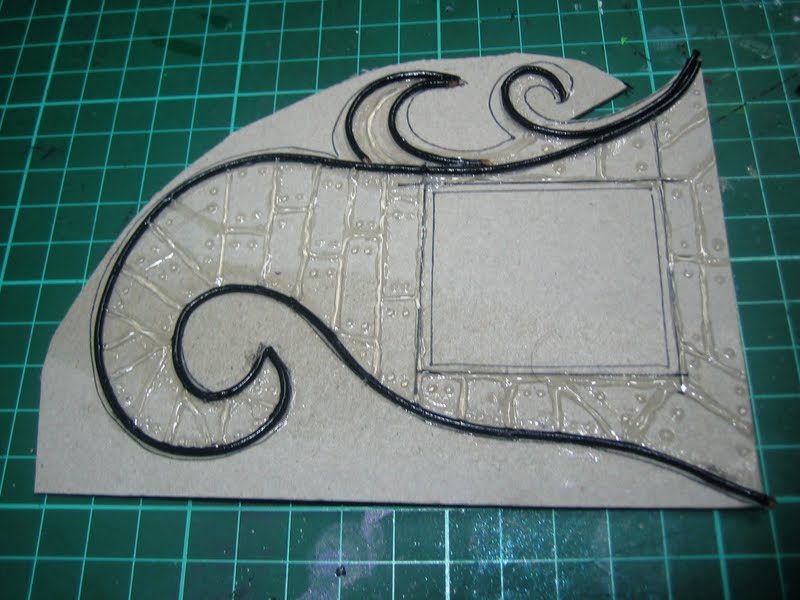

It worked but looked too busy with my mermaid environment and took away from the mermaid shrine.
So I refined it and decided to add glue and keep the "plate" stuck to metal shim...
NOTE: a family that plays together stays together ...
Daniels in the background painting War hammer 40 k miniature models! LOL

See the back of the coffee break shrine as its being positioned to see how it fit
before being stuck to the chipboard wave in the photo bellow...


The back chipboard wave was stuck in place to the shrine and foam spacers put in place to keep the two chipboard waves apart. Then I paper mashed tissue paper over the outside and added a long narrow piece of metal shim round the outside.

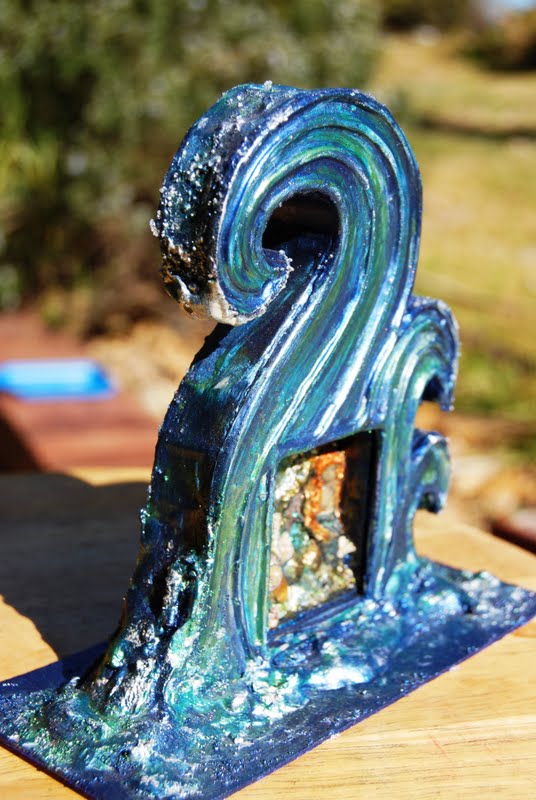
So then I had my wave shape which I painted with this amazzzzinggg
HALO BLUE GOLD LUMIERE Metallic acrylic paint. Slopping it on at the bottom and on the end of the waves then heating it till it boiled and blew up into "bubbly ocean" . I added some texture and a luminous water effect (that's not very visible in the photos) by painting on and boiling some GOLDEN GLASS BEAD MEDIUM (which comes as tiny balls of glass suspended in a gel medium like paste)


I really wanted a quote to hammer into the metal but couldn't find one either short enough
or if they were short enough they weren't mermaid mysterious enough! LOL


Am I a bower bird for just loving that shiny luminous shimmer around the mermaid!
I feel it needs a wooden base?

PRODUCTS USED: COFFEE BREAK DESIGNS MDF SHRINE, 12x 12 Chipboard, TEN SECOND STUDIO METAL SHIM apple green, UTEE clear and gold, Beads, ANGELINA FIBRES, leather twine, Smooch Accent inks, LUMIERE ACRYLIC PAINT halo blue/gold, GOLDEN GLASS MEDIUM Perfect pearls mica paint and Dimensional Magic ....oh and lots of double sided tape glue tissue paper and prayer!!!
PRODUCTS AVAILABLE AT...
Its a lovely keepsake from the Sydney trip even though the closest we came to water was flying there on the way or the browny coloured lake beside the pavilion at Panthers world of entertainment!
Some how I think I was the only one round there seeing mermaids...
oh then again maybe after a big night and a couple of beverages at Panthers .... NAHHHH LOL
Well back to the mountain of unfinished bits and pieces here a fortune telling machine a marionette doll, a dozen layouts one, a layout dated 2006...
Its so old ...I cant even remember the name of the basic grey I was using! LOL,
till next time...
STAY BEAUTIFUL or stay online PEOPLE!!!
:)
:)
No comments:
Post a Comment